
Introduction
The AWS Cloud Computing Platform offers a wide range of cloud services, including databases, storage, compute power, content delivery, and other features that support business to scale and grow. It offers the option as well to just pay for what is actually used. Beyond ensuring maximum availability, AWS’s top priority is giving its customers the best possible privacy and security.
Let’s dive in more details which are the most important components in AWS that achieve privacy and security of data and systems used in the cloud.
• IAM (Identity and Access Management), a powerful service in AWS ensures that only authorised users have access to appropriate resources; so it can restrict who can use an AWS account, what services and resources they can use, and how can they use them.
• Many organisations already have an identity repository outside of AWS such as Active Directory, Google Workspace and would want to use that repository for logging into the cloud environment than create a new and duplicate repository of IAM users. This is achieved by integrating SAML with IAM. SAML (Security Assertion Markup Language) is a protocol used for securely exchanging authentication and authorization data between organisations. So, with the help of SAML a user in an organisation can use their existing identity in Google Workspace and then with SSO (Single Sign-on) they can easily access the AWS resources.
This blog post will be focused on illustrating all the steps required to configure Google Workspace as SAML Idp with AWS. So let’s dive in…
Login flow for IAM federation
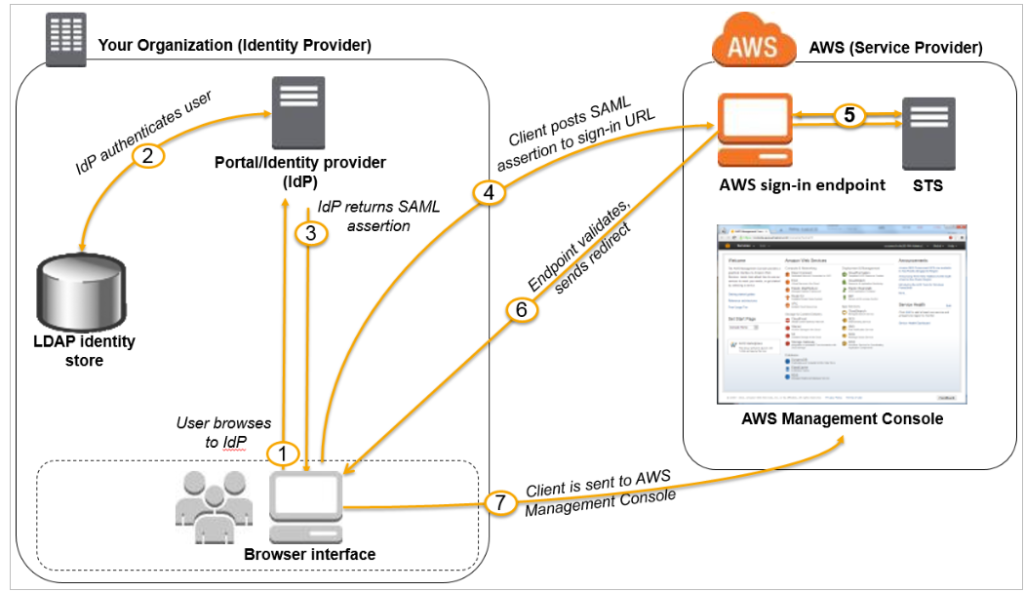
Figure 1: Login flow for IAM federation
The IAM federation login process is shown in Figure 1, which begins at the Google Workspace site and ends at the AWS Management Console. The flow occurs without requiring a username or password, as the figure illustrates.
Let go over each step that takes place throughout the login process:
Step 1: When a user visit https://myaccount.google.com/, the portal authenticates their identity. Following a successful login, the user chooses the nine dots in the top right corner, which brings up a list of programs, one of which allows the user to log into AWS.
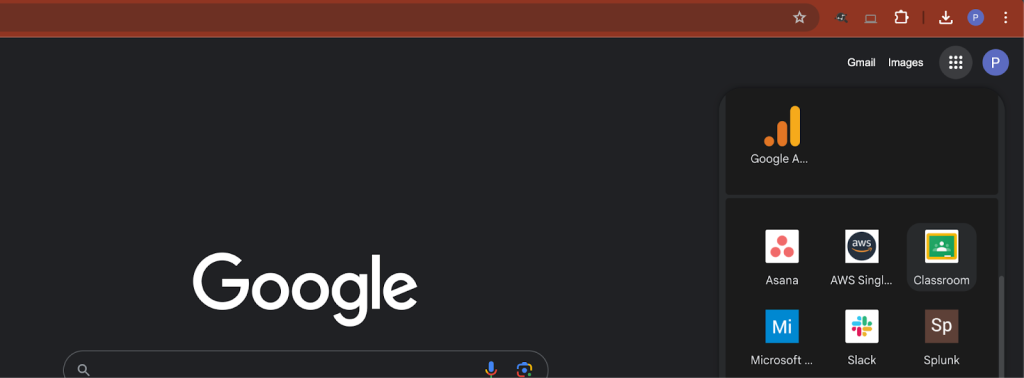
Figure 2: Google account after successful login
Step 2: The portal verifies the user’s identity.
Step 3: The portal generates a SAML authentication response that includes assertions that identify the user and include attributes about the user. The portal sends this response to the client browser.
Step 4: The client browser is redirected to the AWS IAM Identity Center endpoint and posts the SAML assertion.
Step 5: The endpoint requests temporary security credentials on behalf of the user and creates a console sign-in URL that uses those credentials.
Step 6: AWS sends the sign-in URL back to the client as a redirect.
Step 7: The client browser is redirected to the AWS Management Console.
Set up federated IAM Identity Center access via Google Workspace.
Step 1: Download the Google identity provider (IdP) information
Let’s start by getting the SAML metadata, which includes important information to allow your AWS account to verify the IdP.
- Sign in to the Google Workspace Admin console
- After successfully login, in Homepage, click on Security> SSO with Google as SAML IdP
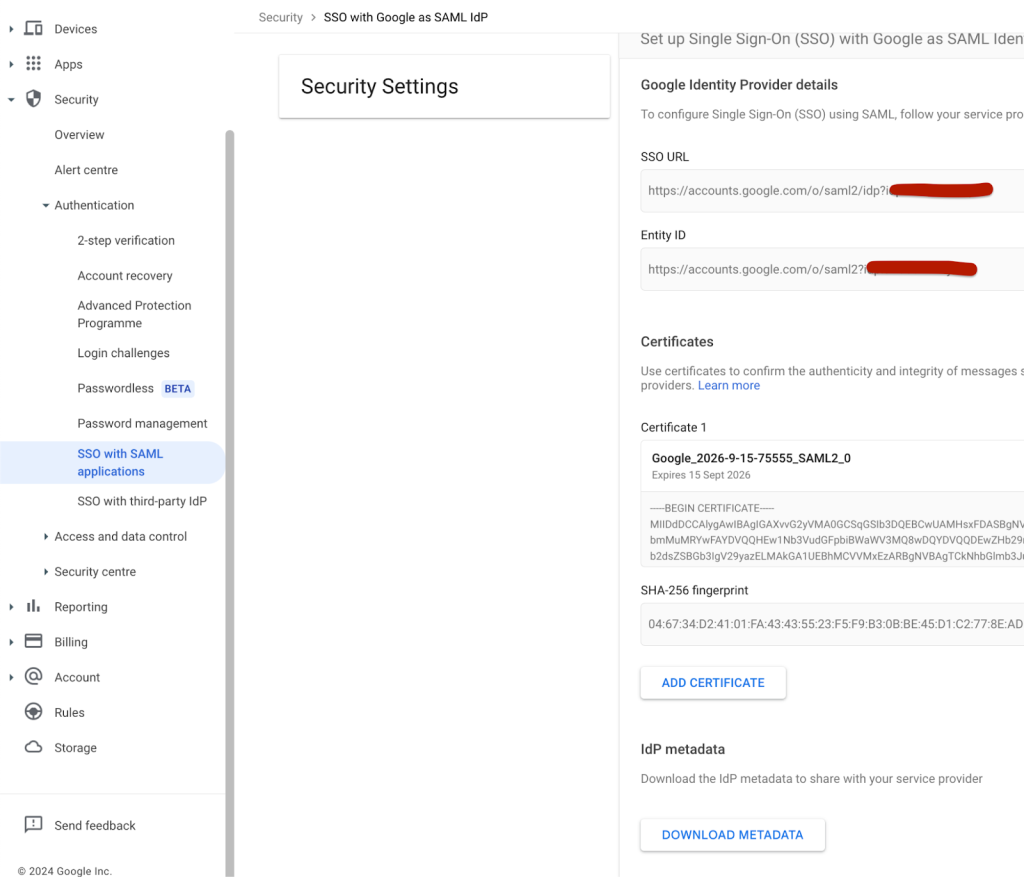
Figure 3: Reaching the “IAM Identity Center for SAML applications” configuration
- Under IdP metadata, click Download Metadata.
Step 2. Create the IAM SAML identity provider in your account
A trust relationship will be established between the AWS account and Google Workspace. In order to do this, an Entity of IAM IdP for Google Workspace must be created. This entity will identify the identity source from which users and groups will be handled.
- Sign in to the AWS Management Console and open the IAM service at https://console.aws.amazon.com/iam/.
- In the navigation panel on the left side, select Identity providers > Add provider.
- Choose SAML as the configure provider.
- Enter the identity provider’s name (such as GoogleWorkspace).
- For Metadata document, select Choose file then specify the SAML metadata document that you downloaded in Step 1–c.
- Check the information you have given. Once finished, Click the button Add provider.

Figure 4: Choose SAML as Provider
- Following the successful creation of the Identity provider in step f, the ARN code—which uniquely identifies an AWS resource—will be shown. It looks something like this:
arn:aws:iam::123456789012:saml-provider/GoogleWorkspace
Step 3. Create roles for your third-party Identity Provider
This phase involves creating the IAM roles that define what a federated user has authorised to access after his successful sign in. In this demonstration we will be creating a role that has full access to only the EC2 service.
- Navigate to AWS IAM console. Select Roles > Create Role.
- From trusted identity choose the SAML 2.0 federation.
- Next in the SAML Provider section, choose the provider which was created in Step 2.
- Choose Allow programmatic and AWS Management Console access to create a role that can access the AWS console and access the AWS services programmatically.
- Verify the information entered and then click the button Next: Permissions.
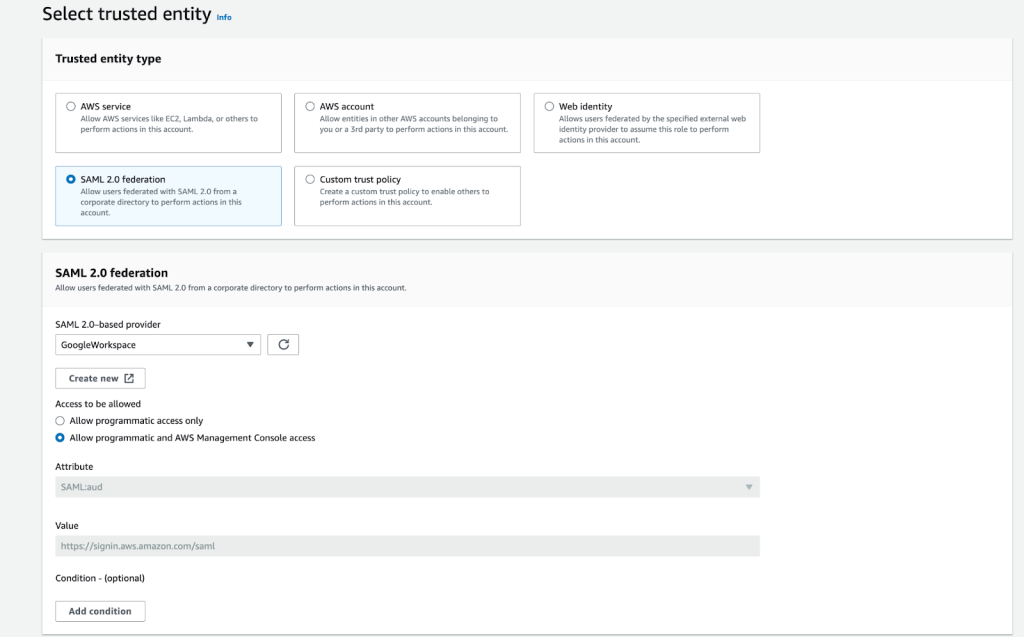
Figure 5: Reviewing your SAML 2.0 trust information
- In the permissions policy page search page, type AmazonEC2FullAccess , Select the policy and Click on Next
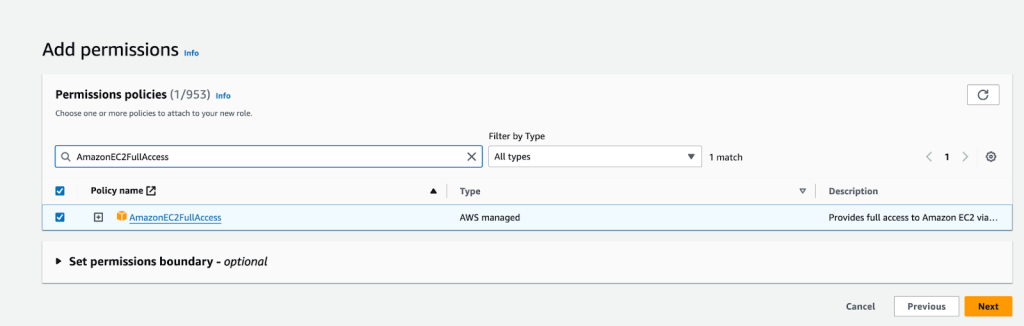
Figure 6: Set the permissions policies for the new role
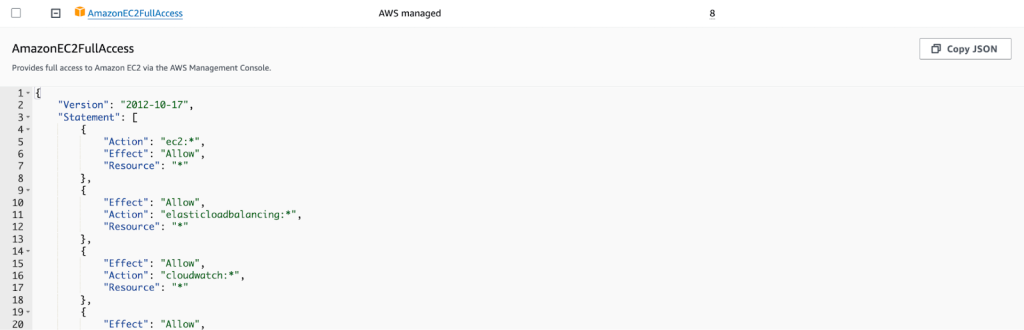
Figure 7: Json Policy Definition that Provides full Access to EC2 service
- In the Review page, assign a name to the Role we are about to create and write a small description. Once you are happy with the settings click on Create Role.
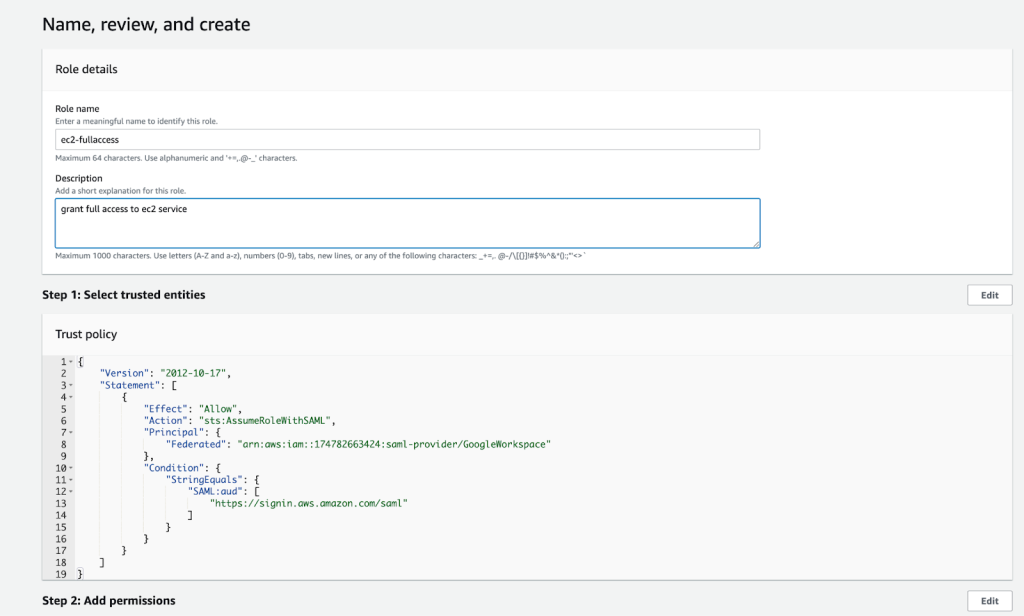
Figure 8: Fill Role details
- A notification will pop up in the upper screen notifying the role was created successfully. Click on the View Role button to visualise the newly created role.

Figure 9: The new role is created.
- In this page, information about the role can be visualised. Make sure to copy the Role ARN as this will be used in the next step.
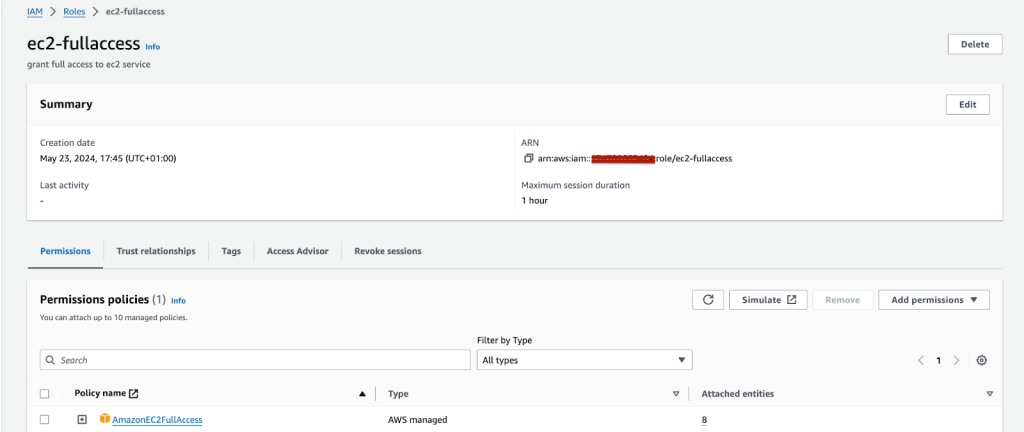
Figure 10: Information about the role is visualised.
Step 4. Assign the user’s role in Google Workspace
In this stage the roles generated in the previous phase will be allocated to a particular user so they can access and use the AWS console.
- Sign in to the Google Admin console.
- In the Left side panel, go to Directory > Users > Manage custom attributes, and select Add Custom Attribute.
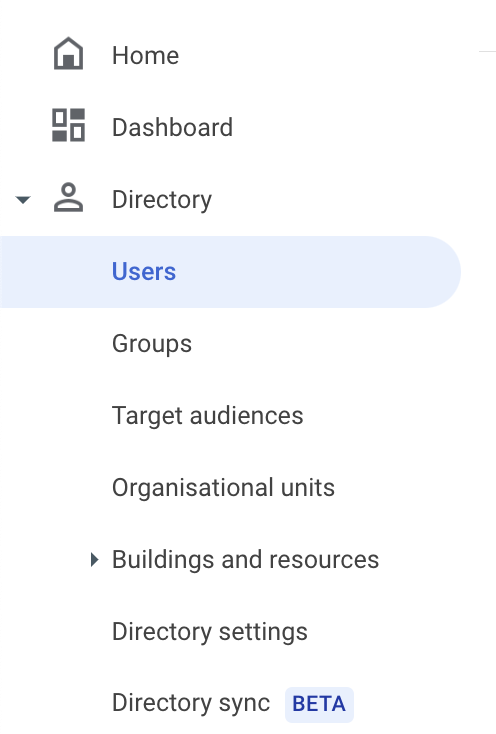
Figure 11: Click to add custom attributes.
- Set up the custom attribute as follows:
- Category: AWS
- Description: Amazon Web Services Role Mapping
For Custom fields, enter the following values:
- Name: AssumeRoleWithSaml
- Info type: Text
- Visibility: Visible to user and admin
- InNo. of values: Multi-value
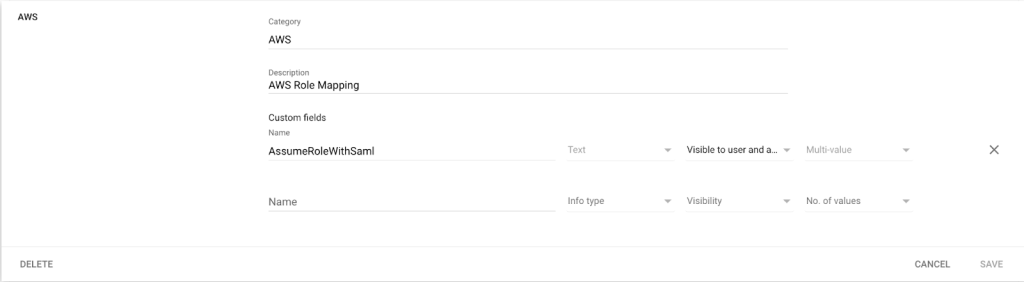
Figure 12: Enter the values for custom attributes.
- Choose Add. You can see the new category in the Manage user attributes page.

Figure 13: The custom attribute is added.
- Navigate to Users, search the name of the user you want to grant permissions for to federate into AWS. To access the user’s account page, select their name, and then select User Information.

Figure 14: the username that you want to provide permission is selected.
- Click on the newly generated custom attribute called AWS. Add RoleARN + “,”+ Identity provider ARN .
Row 1:
arn:aws:iam::123456789012:role/ec2-fullaccess,arn:aws:iam:: 123456789012:saml-provider/GoogleWorkspace
By using the two ARN correctly, the format of AssumeRoleWithSaml is generated; this value is then provided as the SAML attribute value for the attribute with name https://aws.amazon.com/SAML/Attributes/Role. The final result will be as below:
Step 5. Set up Google Workspace as a SAML identity provider (IdP) for AWS
To enable SAML authentication, this step will integrate the SAML app with the Google Workspace account by adding SAML attributes.
Log into the Google Admin console.
- From Homepage, choose Apps > Web and mobile apps.
- Choose Add custom SAML app from the Add App dropdown.
- In the App Name field, type AWS Single-Account Access and then submit an optional app icon to identify for SAML application. Then, click Continue.
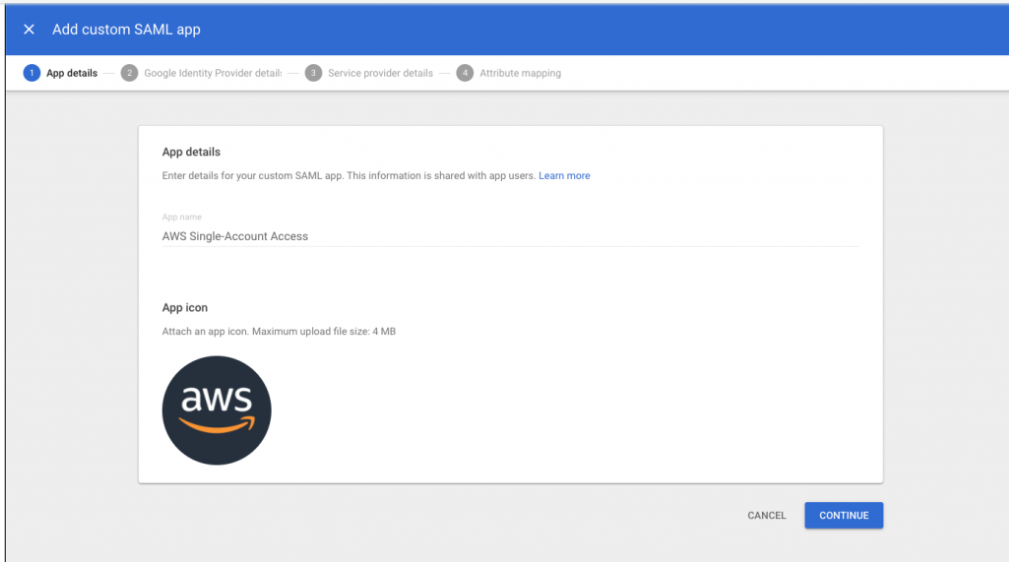
Figure 15: Naming the custom SAML app and setting the icon
- Fill in the following values:
- ACS URL: https://signin.aws.amazon.com/saml
- Entity ID: urn:amazon:webservices
- Name ID format: EMAIL
- Name ID: Basic Information > Primary email
- Note: The AWS session name for your role will be taken from your primary email.
- Click Continue
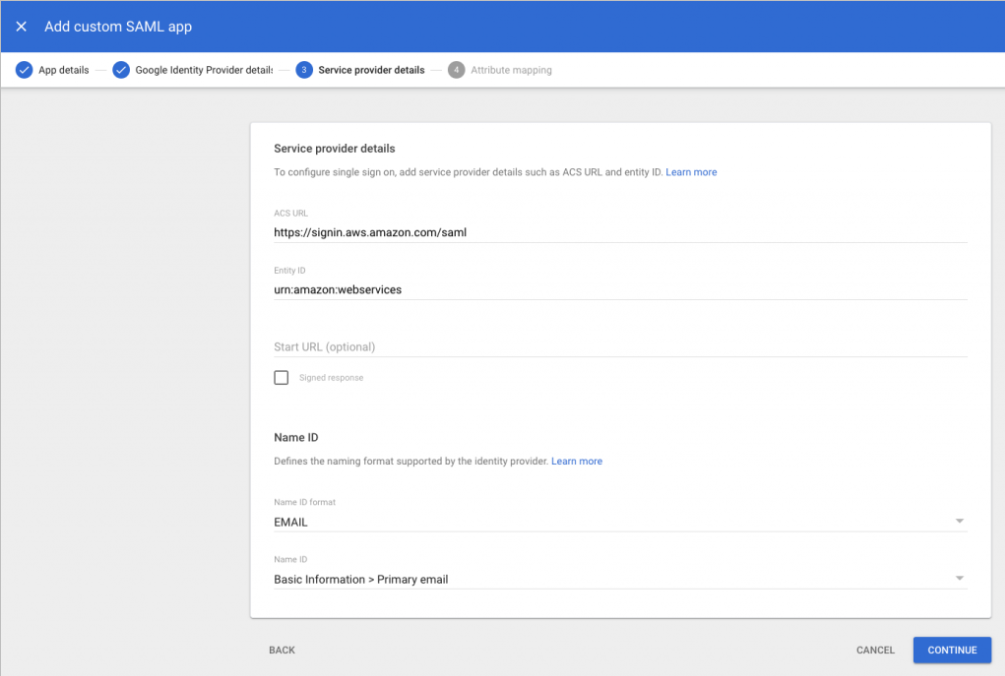
Figure 16: Adding the custom SAML app
- AWS requires the IdP to issue a SAML assertion with some mandatory attributes (known as claims). For instructions on configuring SAML assertion, check the AWS documentation. Let’s start creating an assertion as follows:
- An attribute of name https://aws.amazon.com/SAML/Attributes/Role. This attribute specifies in which IAM identity provider and role is mapped your IdP
- An attribute of name https://aws.amazon.com/SAML/Attributes/RoleSessionName that specifies the federated user’s role session name in AWS.
- A name identifier (NameId) identify the subject of a SAML assertion.
| Google Directory attributes | App attributes |
| AWS > AssumeRoleWithSaml | https://aws.amazon.com/SAML/Attributes/Role |
| Basic Information > Primary email | https://aws.amazon.com/SAML/Attributes/RoleSessionName |
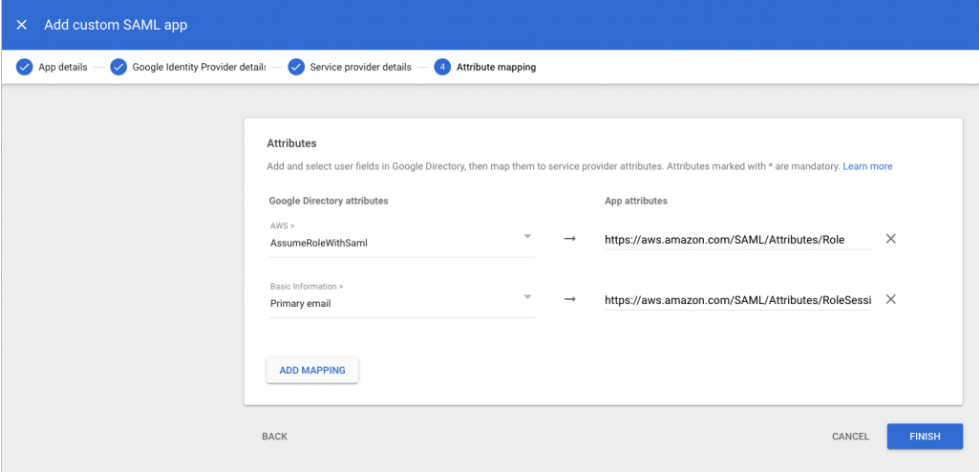
Figure 17: Mapping between Google Directory attributes and SAML attributes
- Click Finish
Step 6. Test the integration between Google Workspace and AWS IAM
- Sign in into Google Admin portal.
- From Homepage, go to Apps > Web and mobile apps.
- Choose the AWS SSO Application that was created
- At the top left, select TEST SAML LOGIN, then choose ALLOW ACCESS in the popup that will open.
- Choose the On for everyone option to make the new SAML custom app visible to all users in the Google workplace. Click Save.
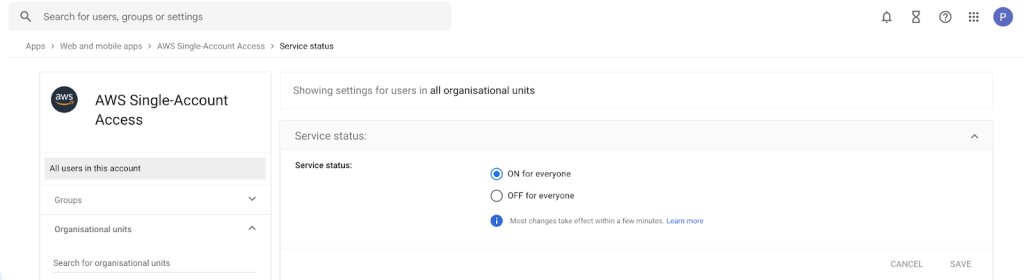
Figure 18: Saving the custom app settings
- Click Web and mobile app in the left side panel, then select TEST SAML login once more. On the click, you will be redirected to the AWS console
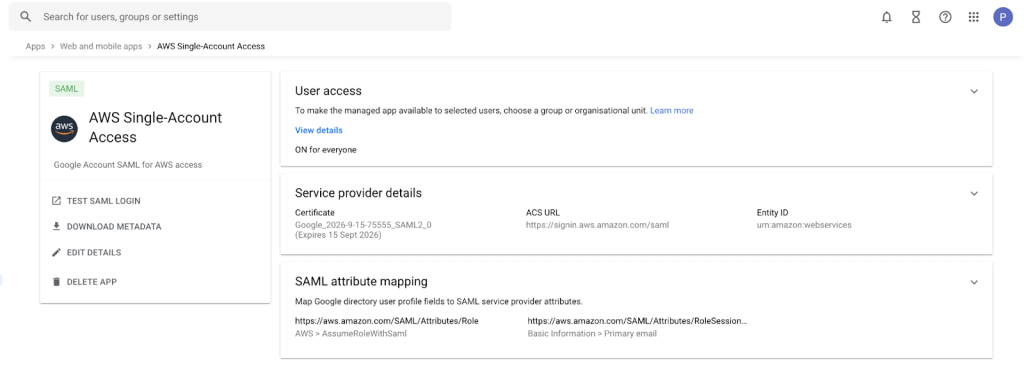
Figure 19: Testing SAML login again
- Because more than one role was assigned to this user, AWS gives the option to select the Role you want to assume when accessing the console. Click on ec2-fullaccess
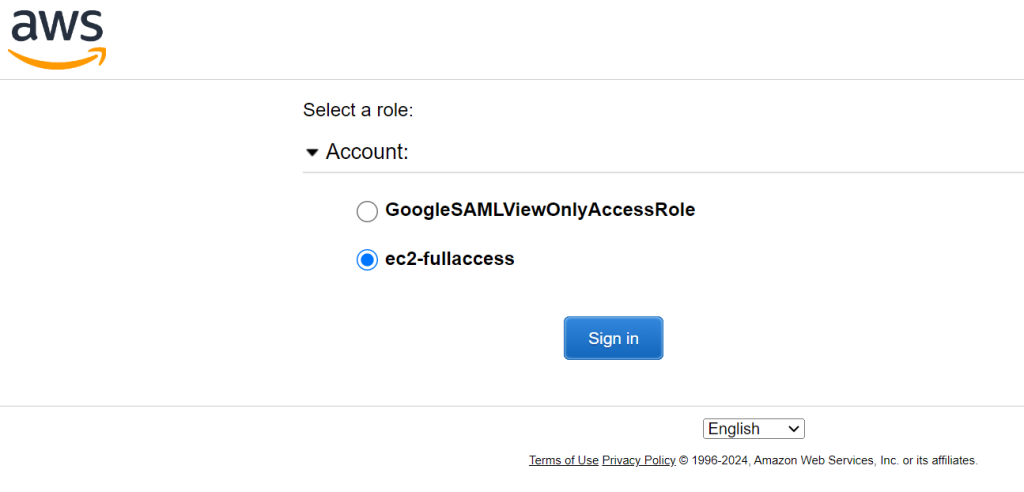
Figure 20: Selecting the IAM role you wish to assume for console access
- The front page of the AWS Management Console should now appear.
- From the AWS console navigate to the EC2 service
- Because full access has been granted to the EC2, the user is able to perform all actions related to the EC2 service
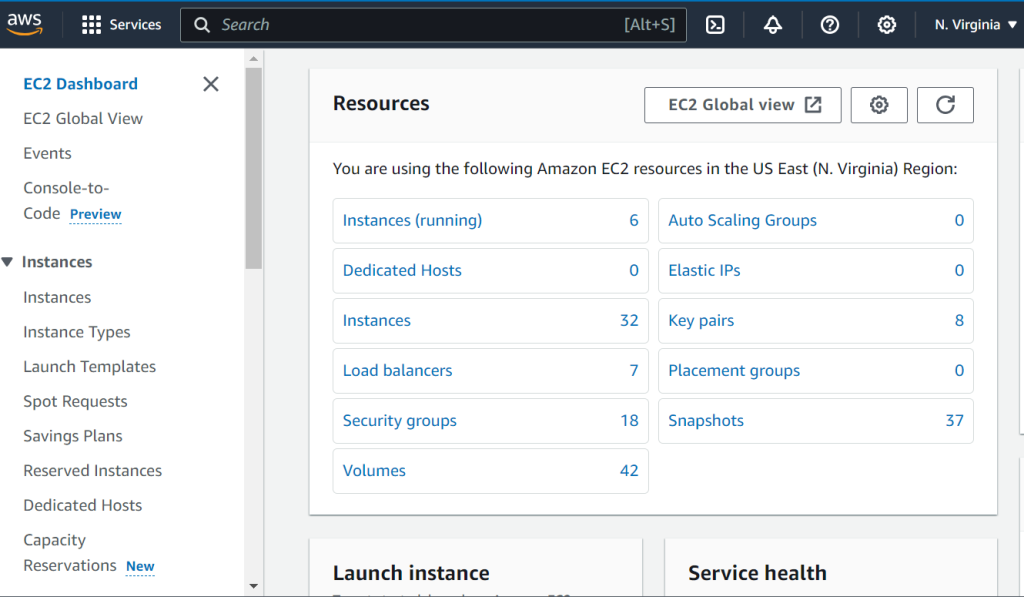
Figure 21: Check if the user have full access to EC2
- If we were to navigate to a difference service (S3 for example) the user will not be able to perform any action as no permissions were explicitly granted in the Policy document created
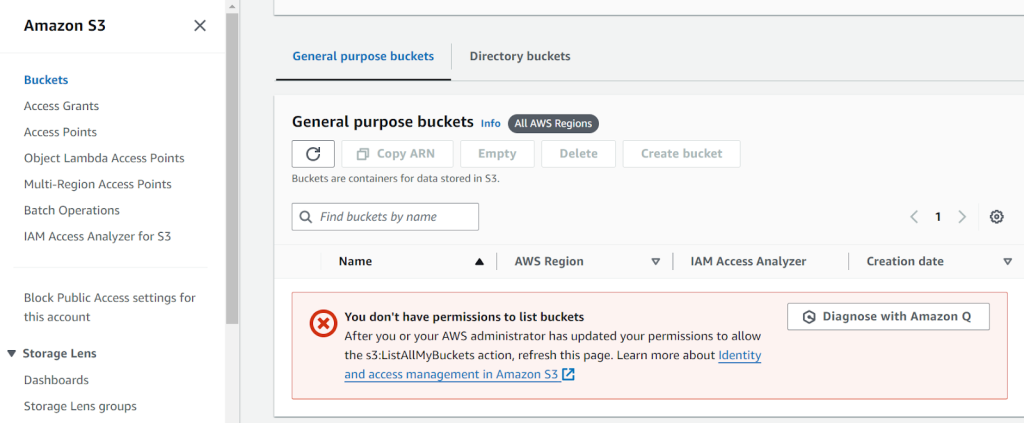
Figure 22: Any attempt to access a service other than EC2 will result in a permission-related error.